Creating a Deal Jacket
Deal Jackets in My Dealer Jacket allow you to gather all relevant vehicle sale information in one place—from vehicle details and buyer information to pricing, payments, and forms. Follow the steps below to create a new deal jacket and manage all required data.
Log In to Your Account
First, ensure you are logged into your My Dealer Jacket account. For detailed instructions, refer to the Logging In to My Dealer Jacket article.
Video Guide
Screenshot Guide
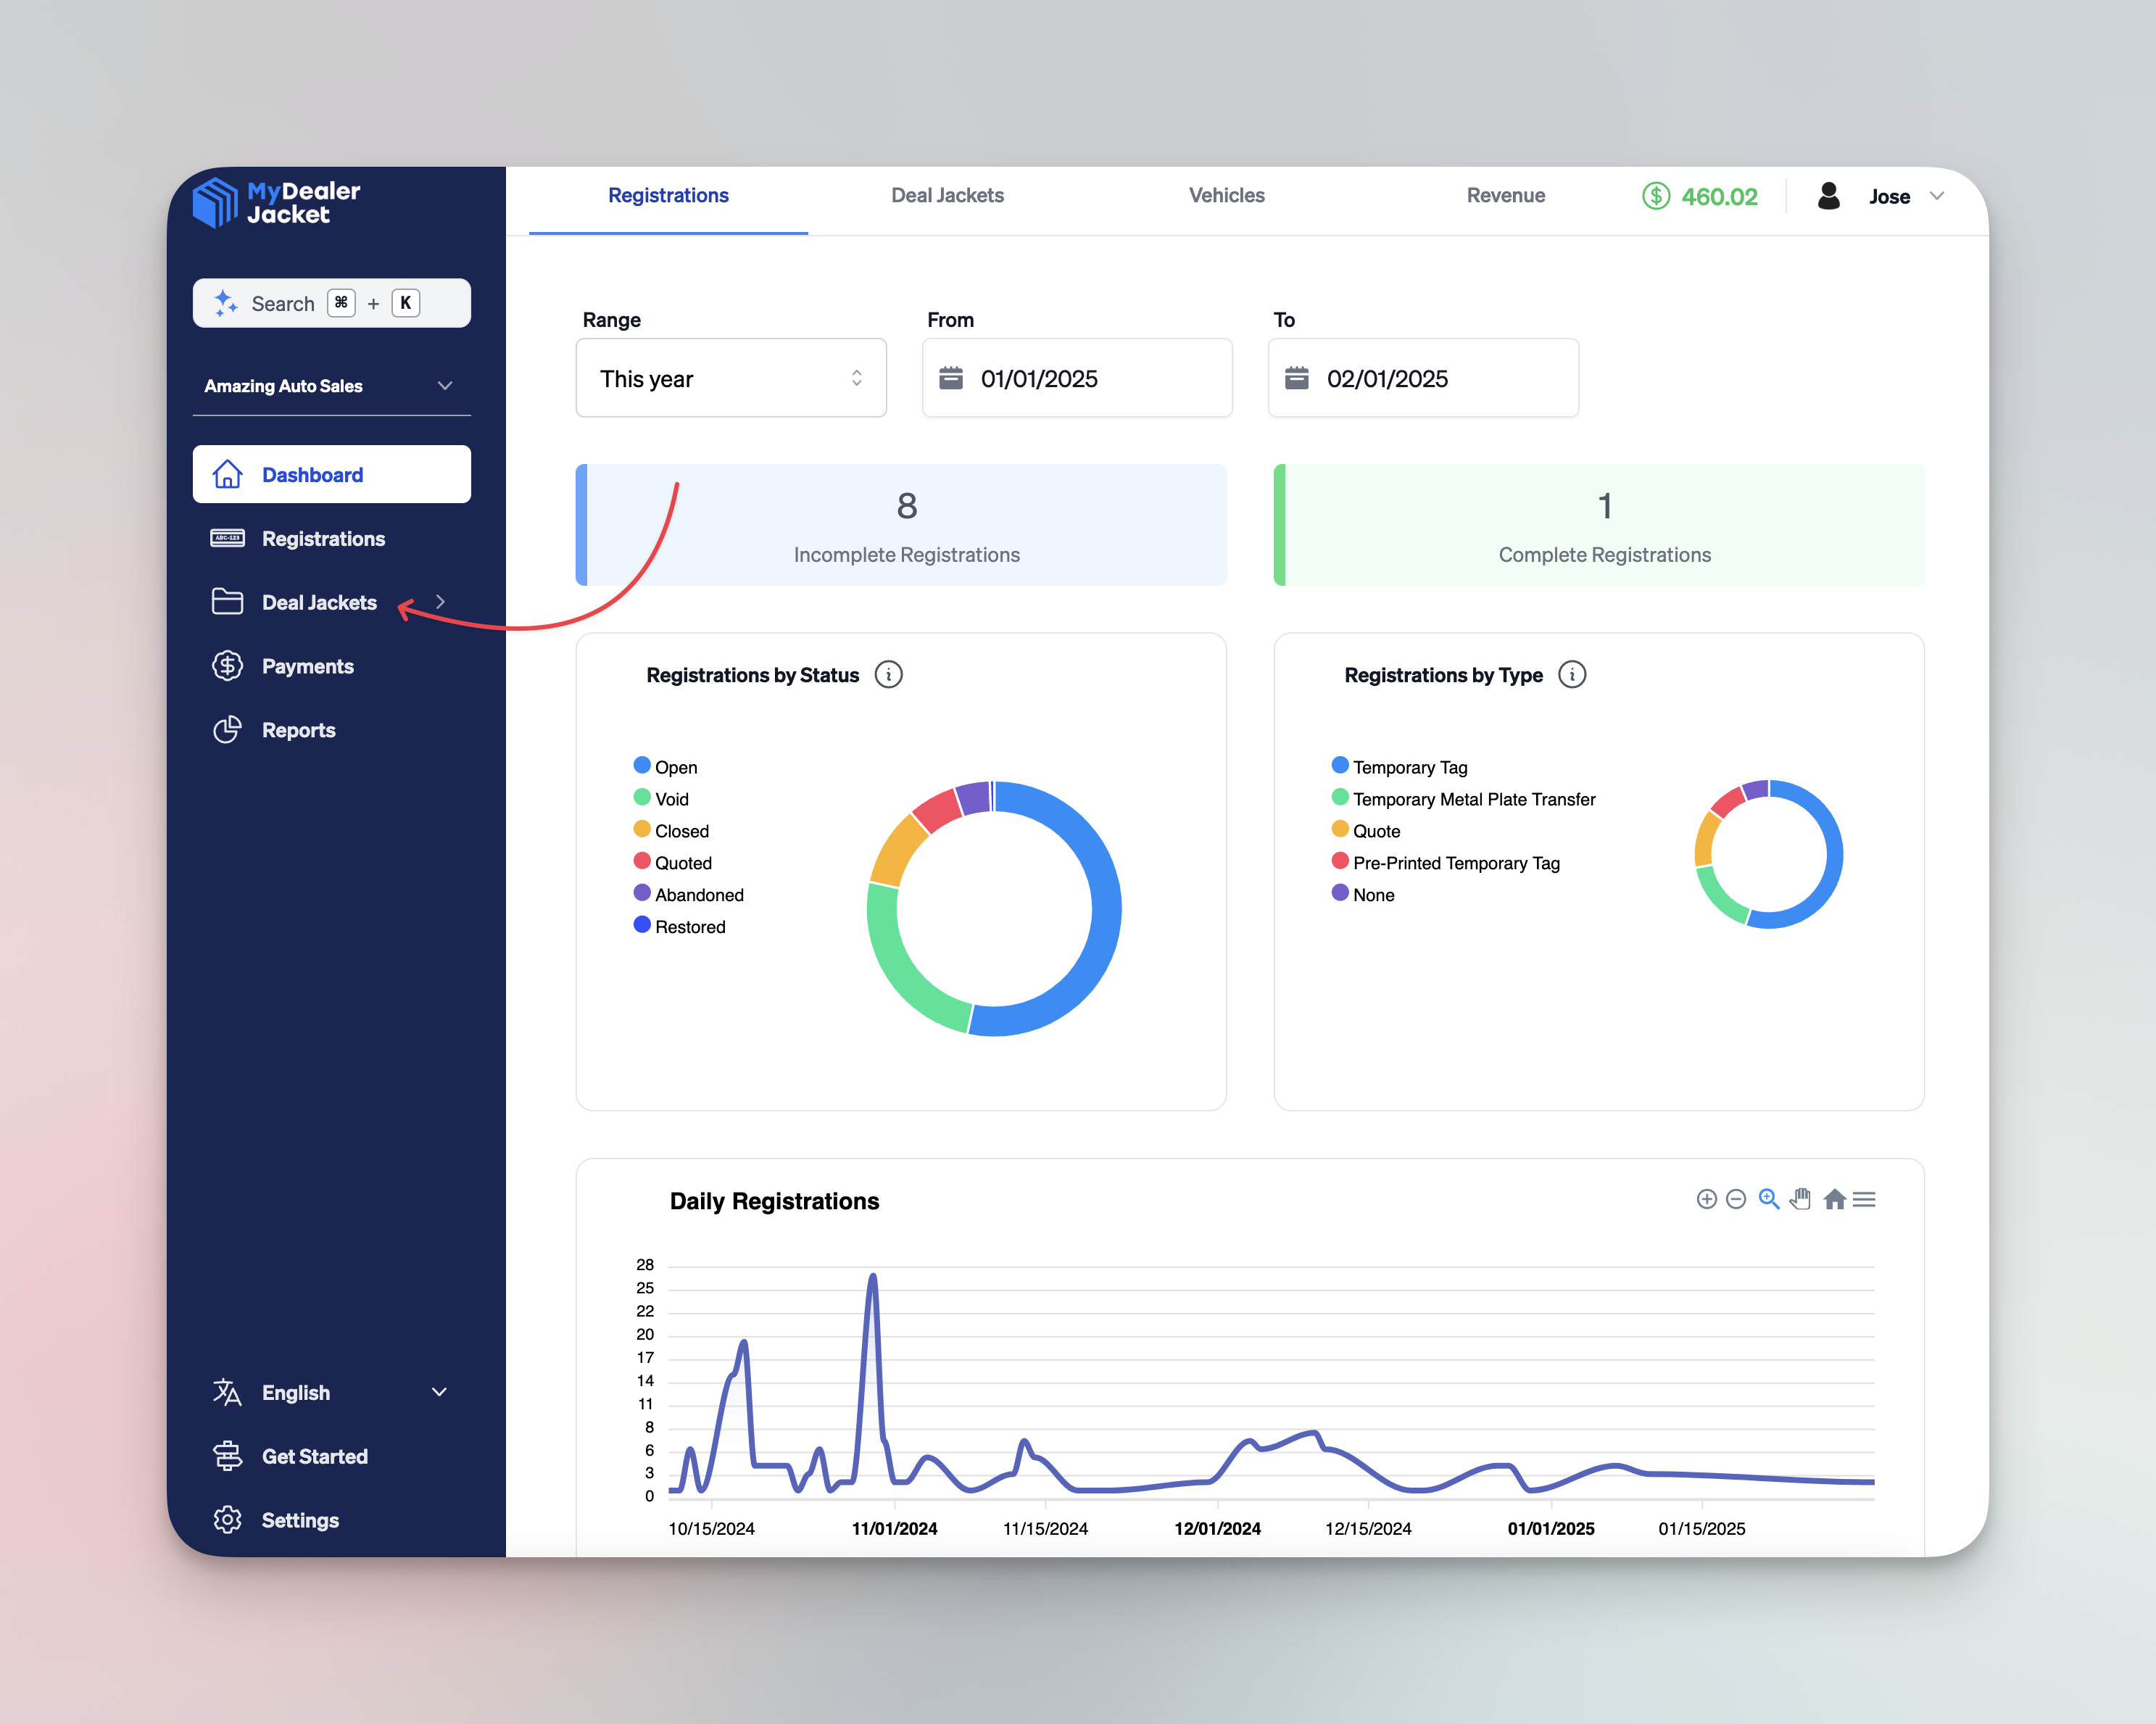
Access the Deal Jacket Folder
From the main Dashboard, locate the Deal Jacket folder on the sidebar menu.
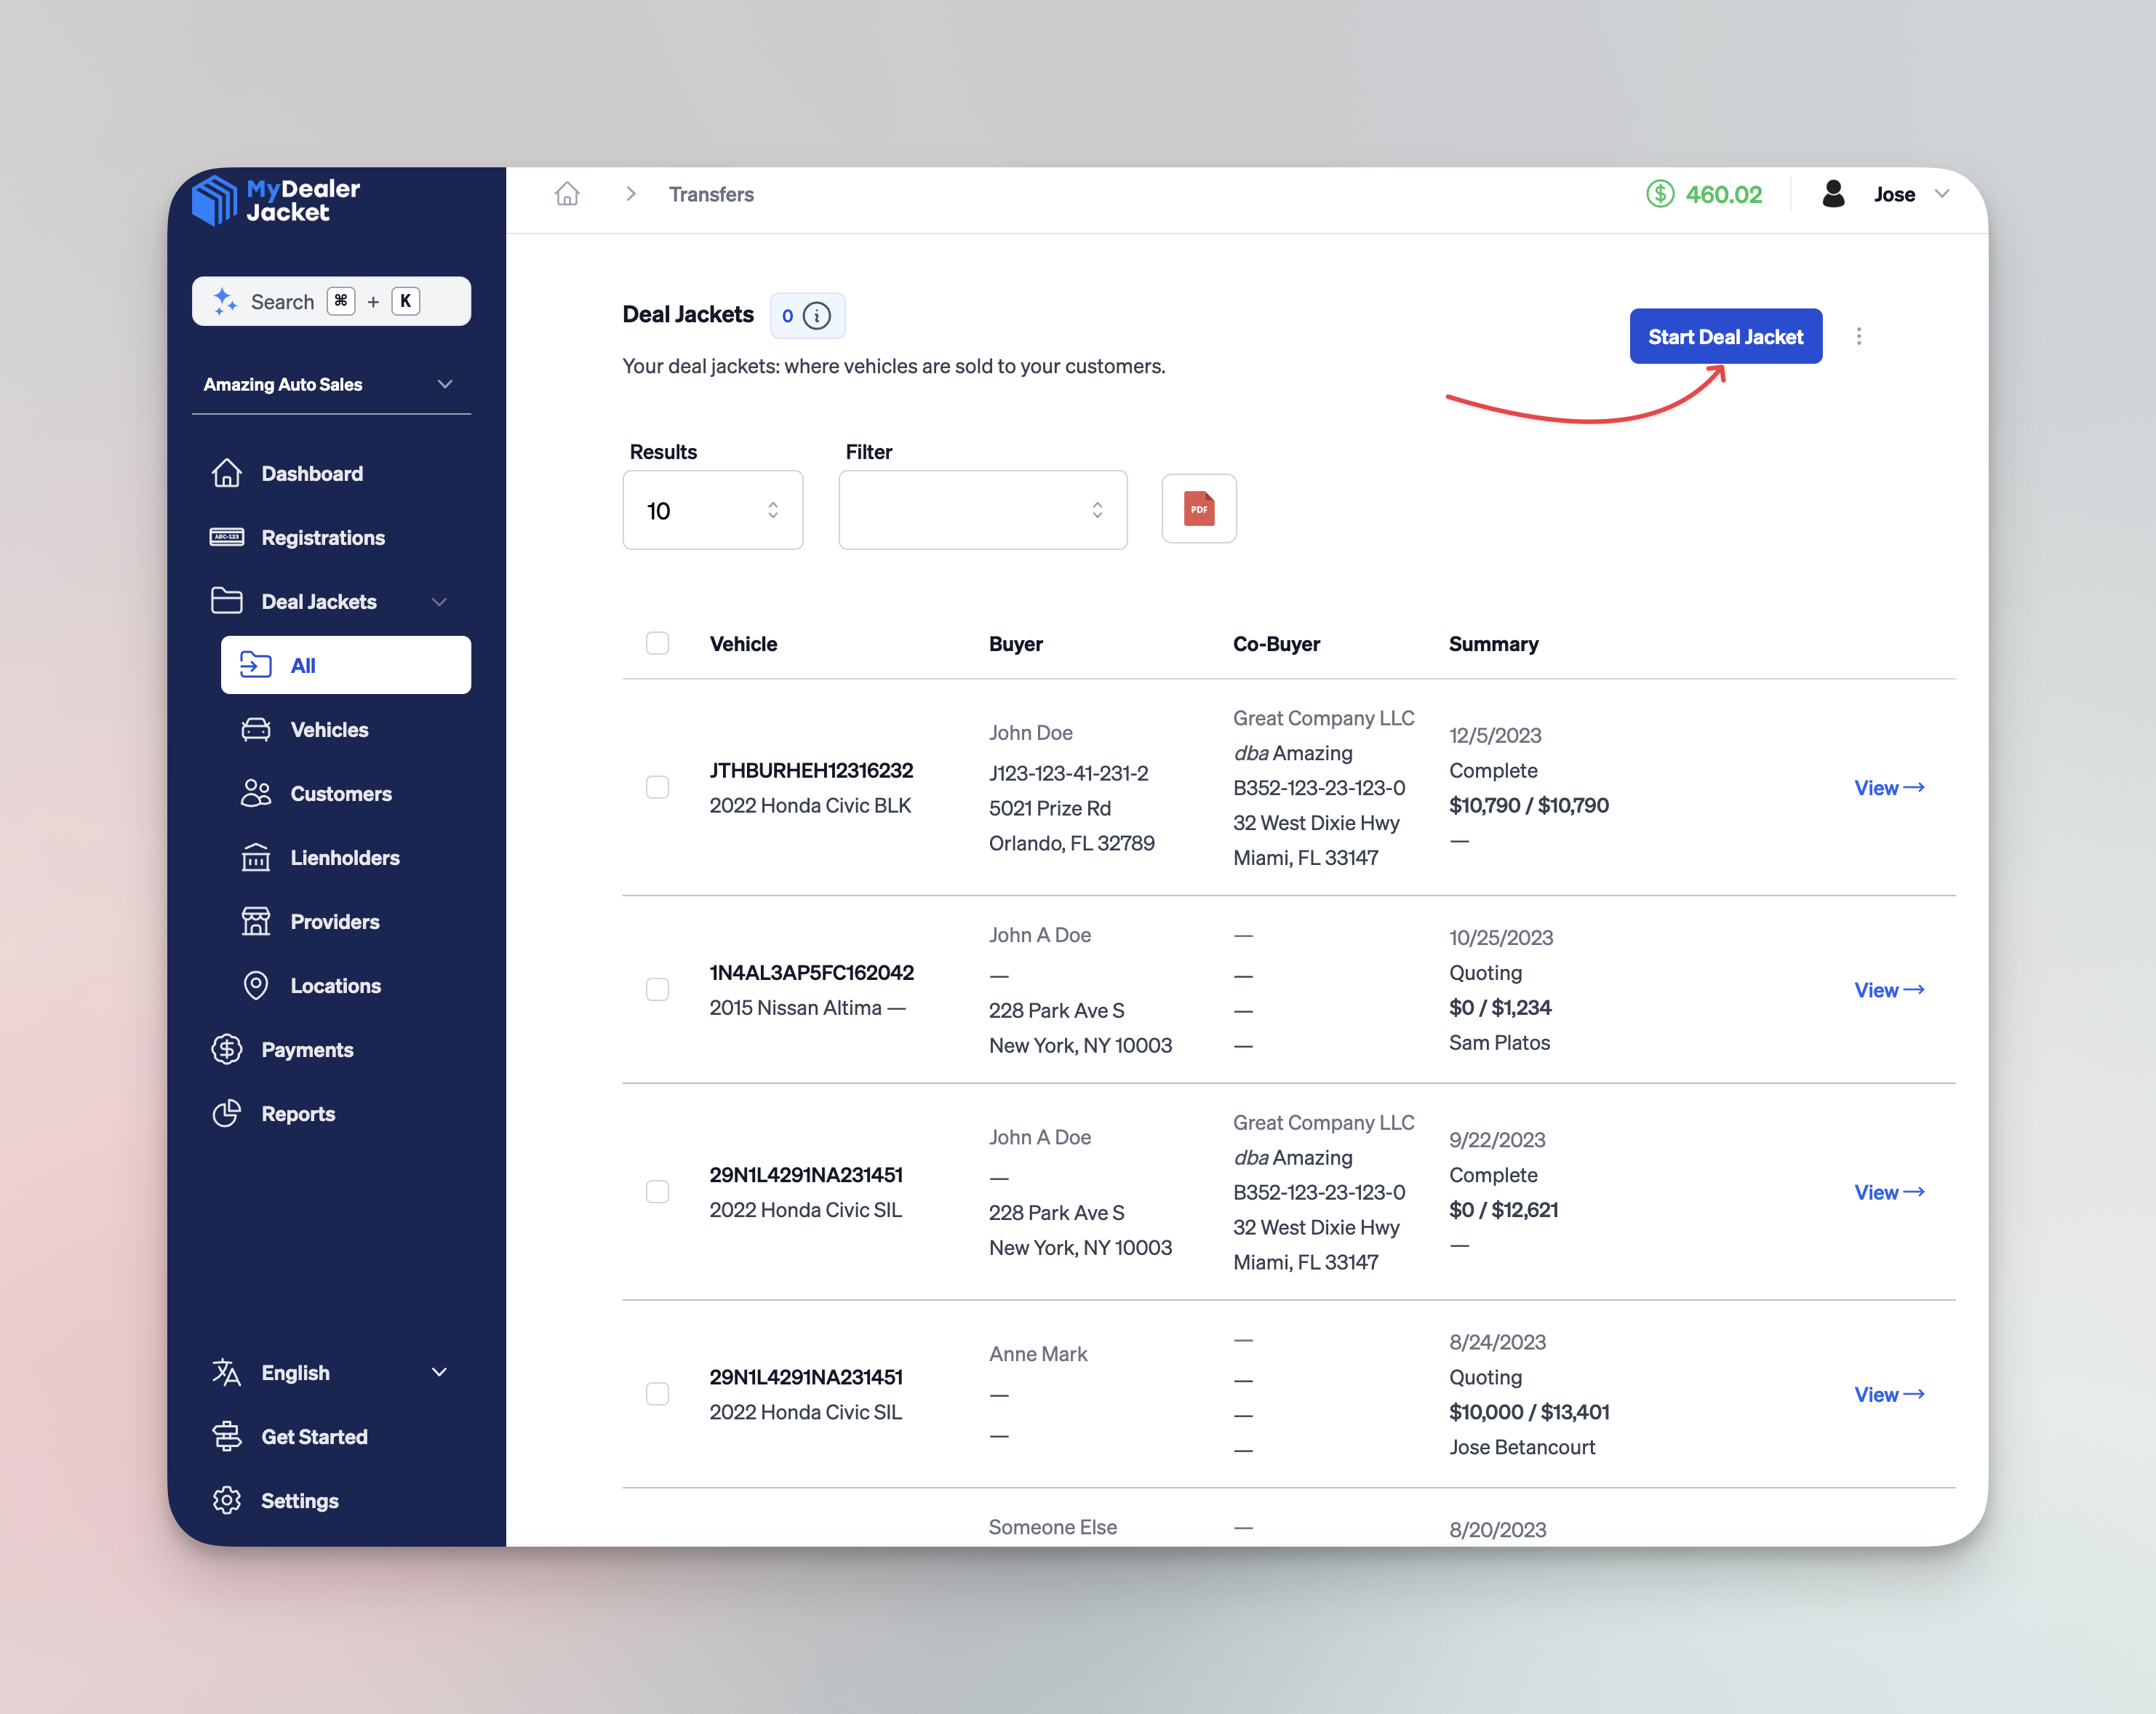
Start a New Deal Jacket
Under the Deal Jacket folder, ensure All is selected, then click Start Deal Jacket.
Complete Deal Jacket Tabs
At the top of the page in the newly created Deal Jacket, you will see a series of tabs.
These tabs can be completed in any order, but logically it’s best to start from Vehicle and work your way through to Documents.
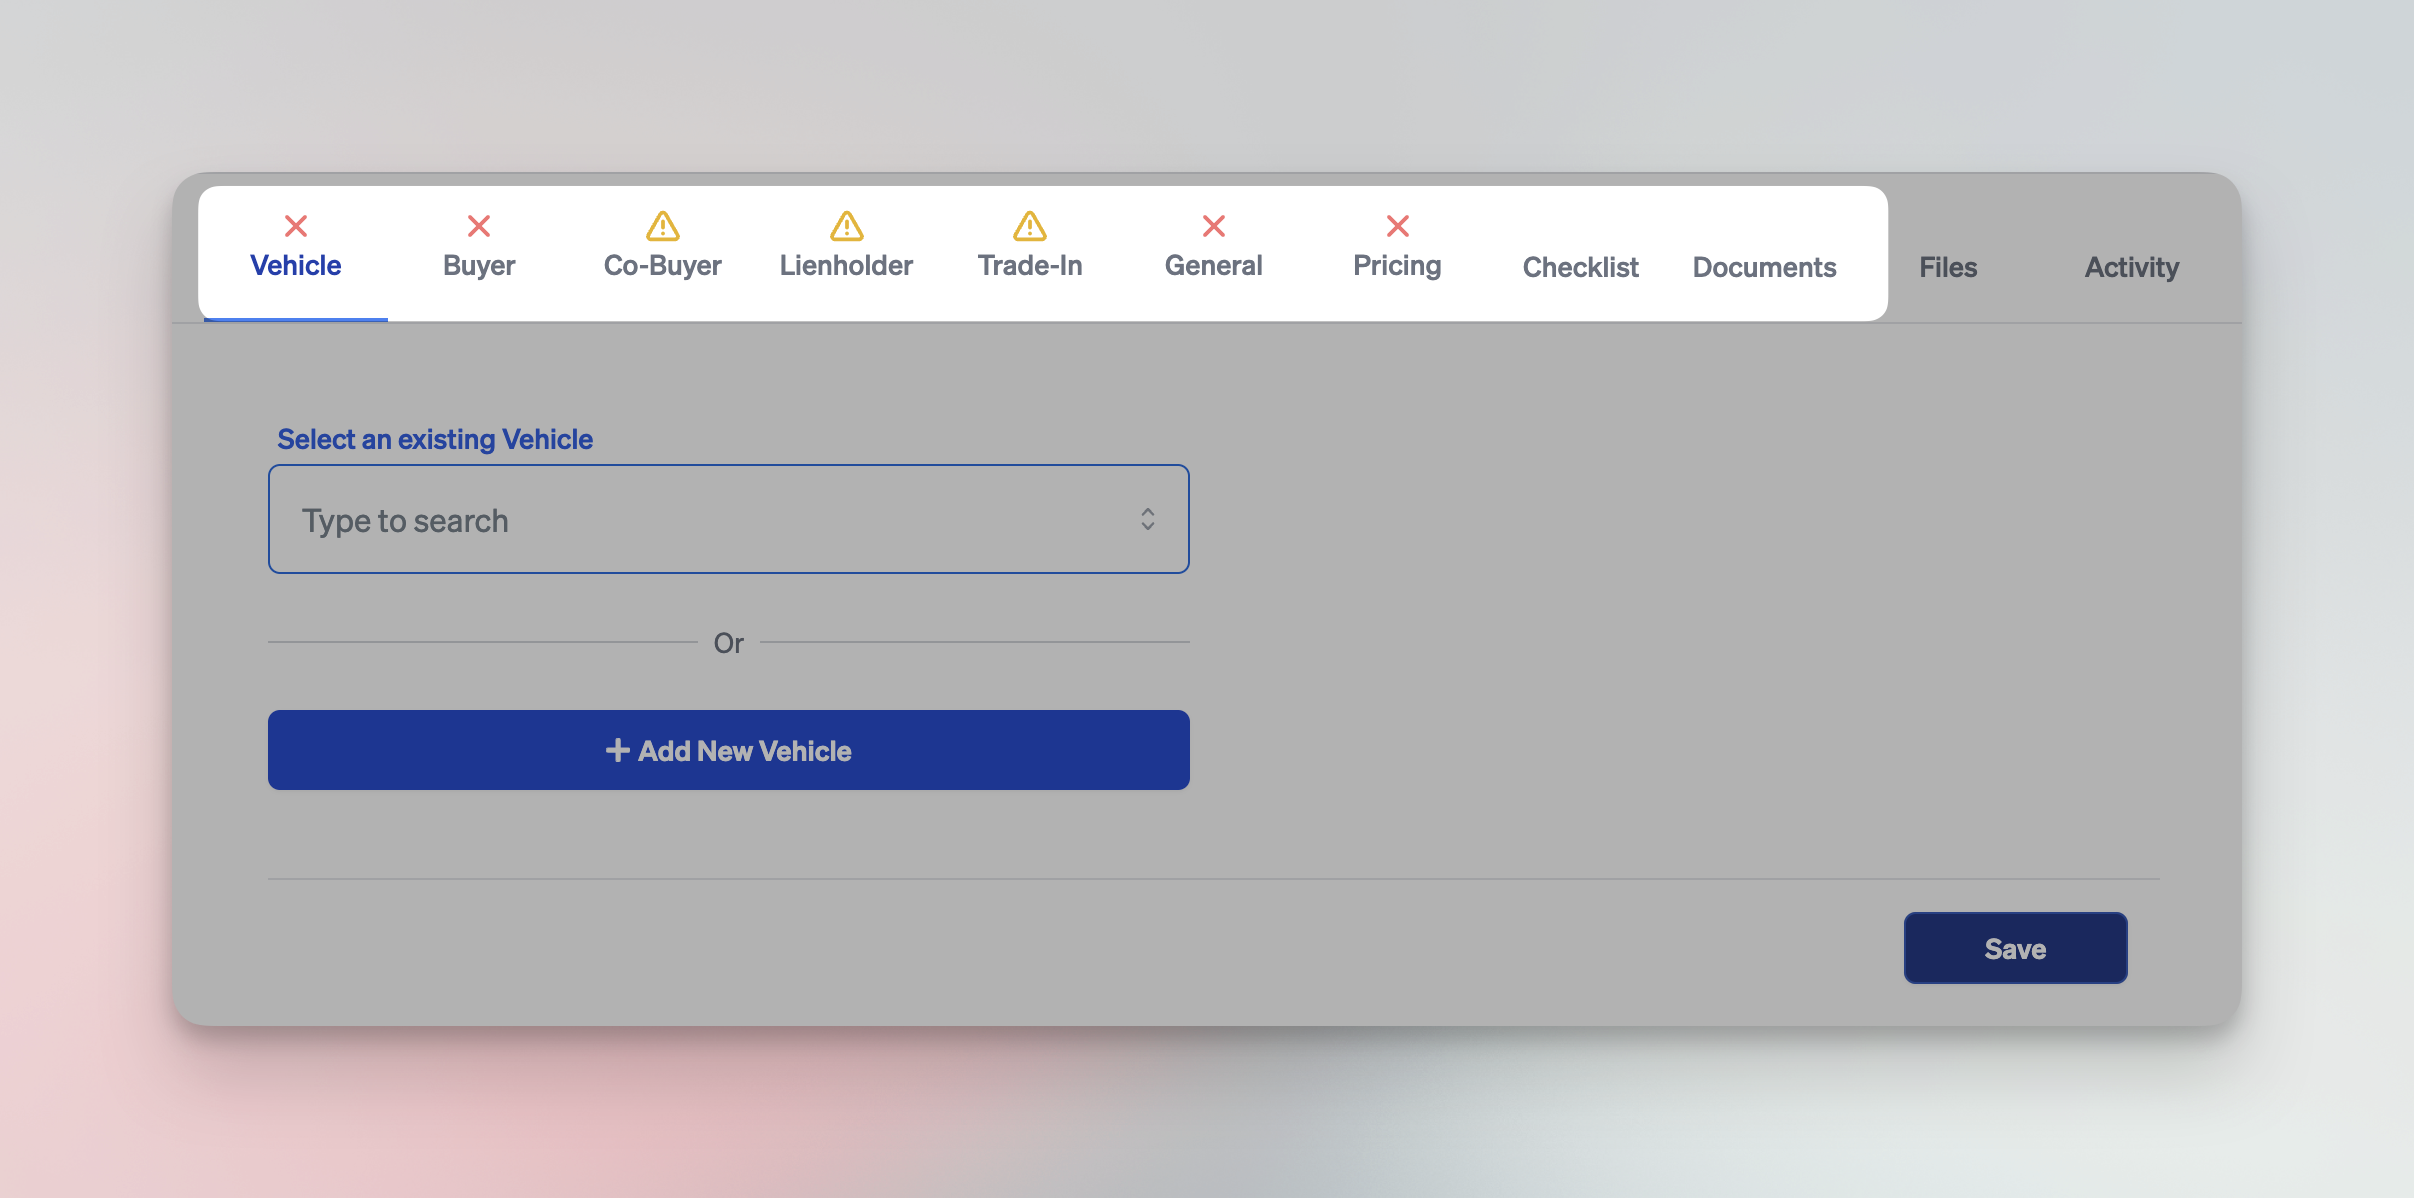
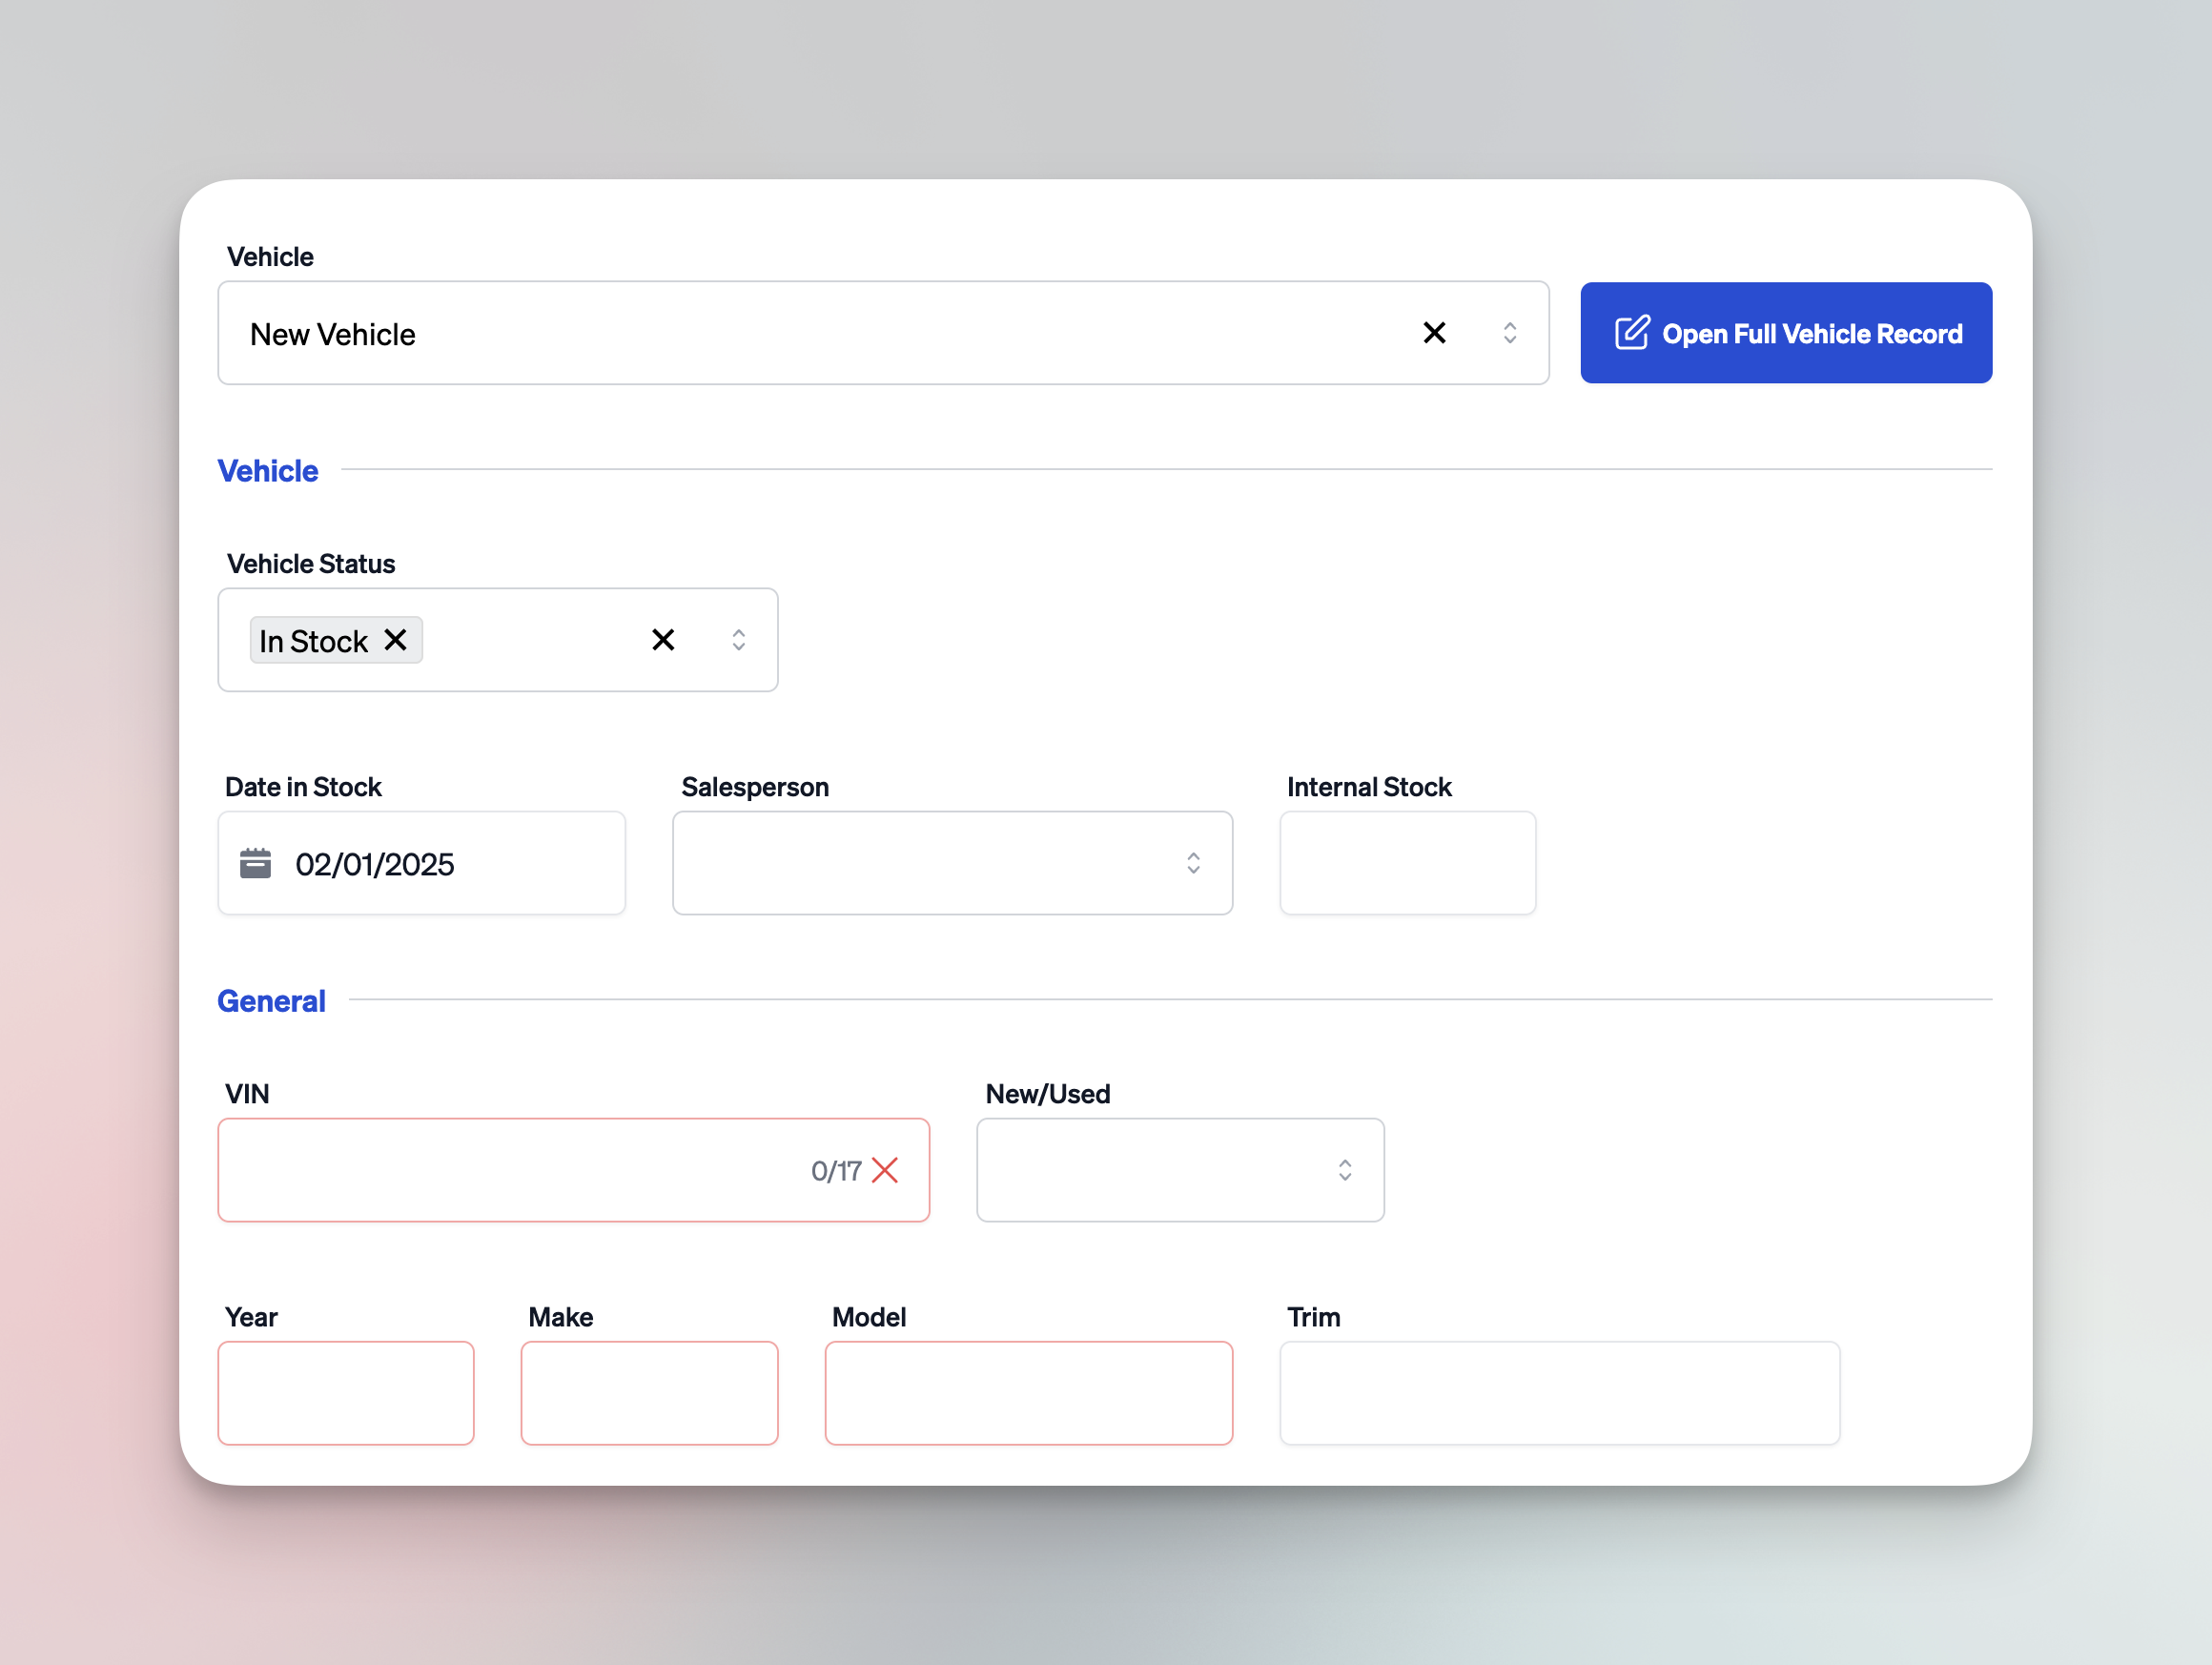
Vehicle Tab
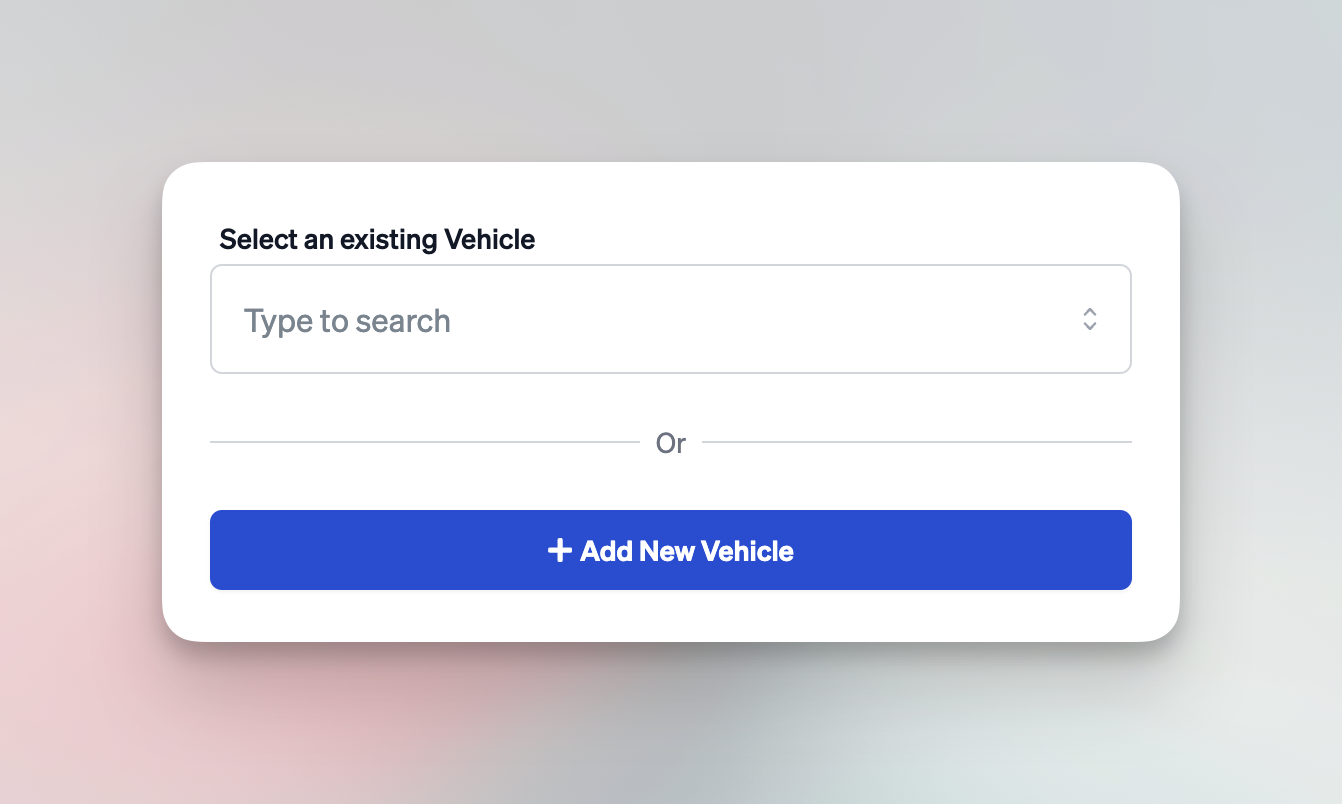
Search for an Existing Vehicle or Add a New Vehicle
- In the Vehicle tab, search the existing list of vehicles by VIN, Year, Make, Model, or any other identifying detail.
- If the vehicle does not appear in the search results, click Add New Vehicle to create a new vehicle record.
Enter or Update Vehicle Information
When adding a new vehicle, complete all required fields, including:
- VIN
- Year, Make, and Model
- Color
- Body Type (e.g., Sedan, Coupe, SUV, Truck)
- Title Number
- Vehicle Brands (e.g., Salvage, Rebuilt, Flood, etc.)
Buyer Tab
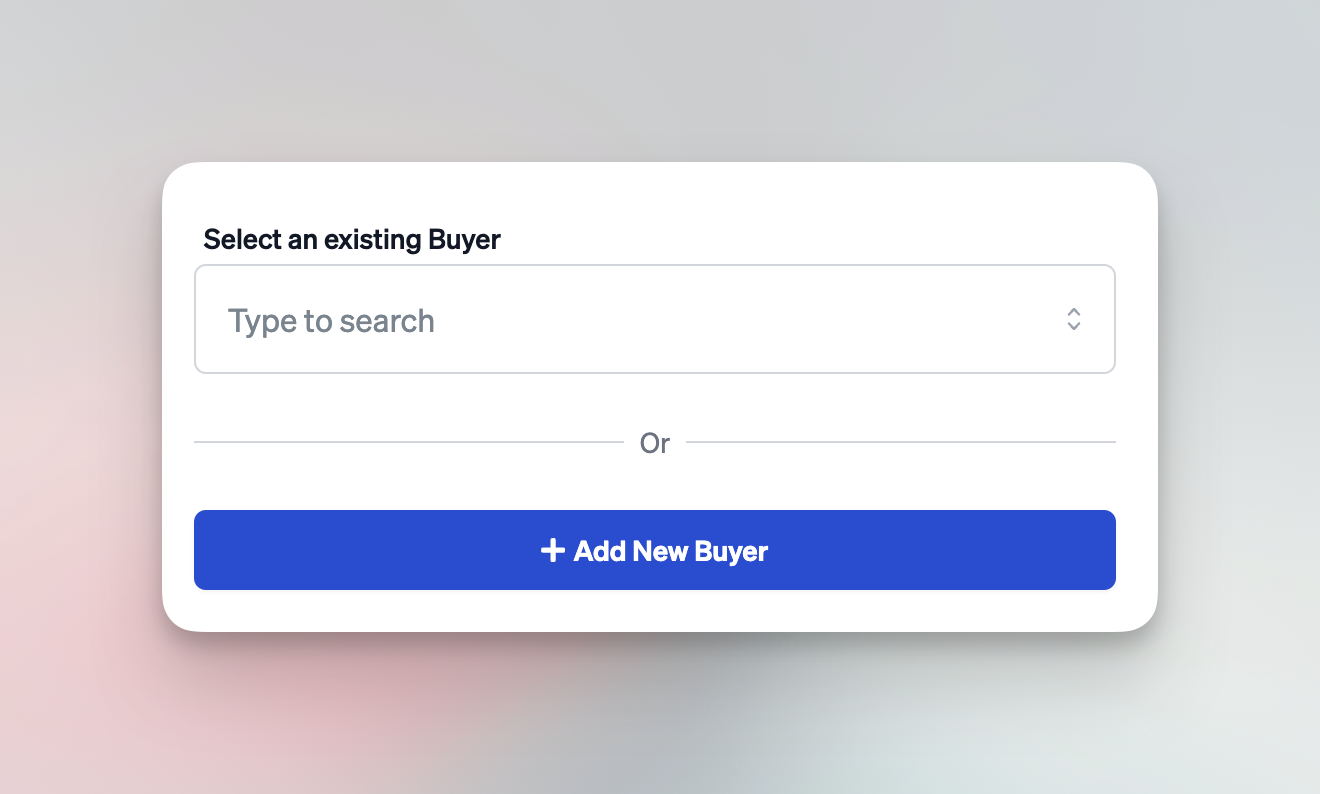
Search for an Existing Buyer or Create a New Buyer
- In the Buyer tab, start typing the buyer’s name or other identifying information (e.g., Driver License, FEIN).
- Select the matching record from the dropdown, or if no record is found, click Add New Buyer.
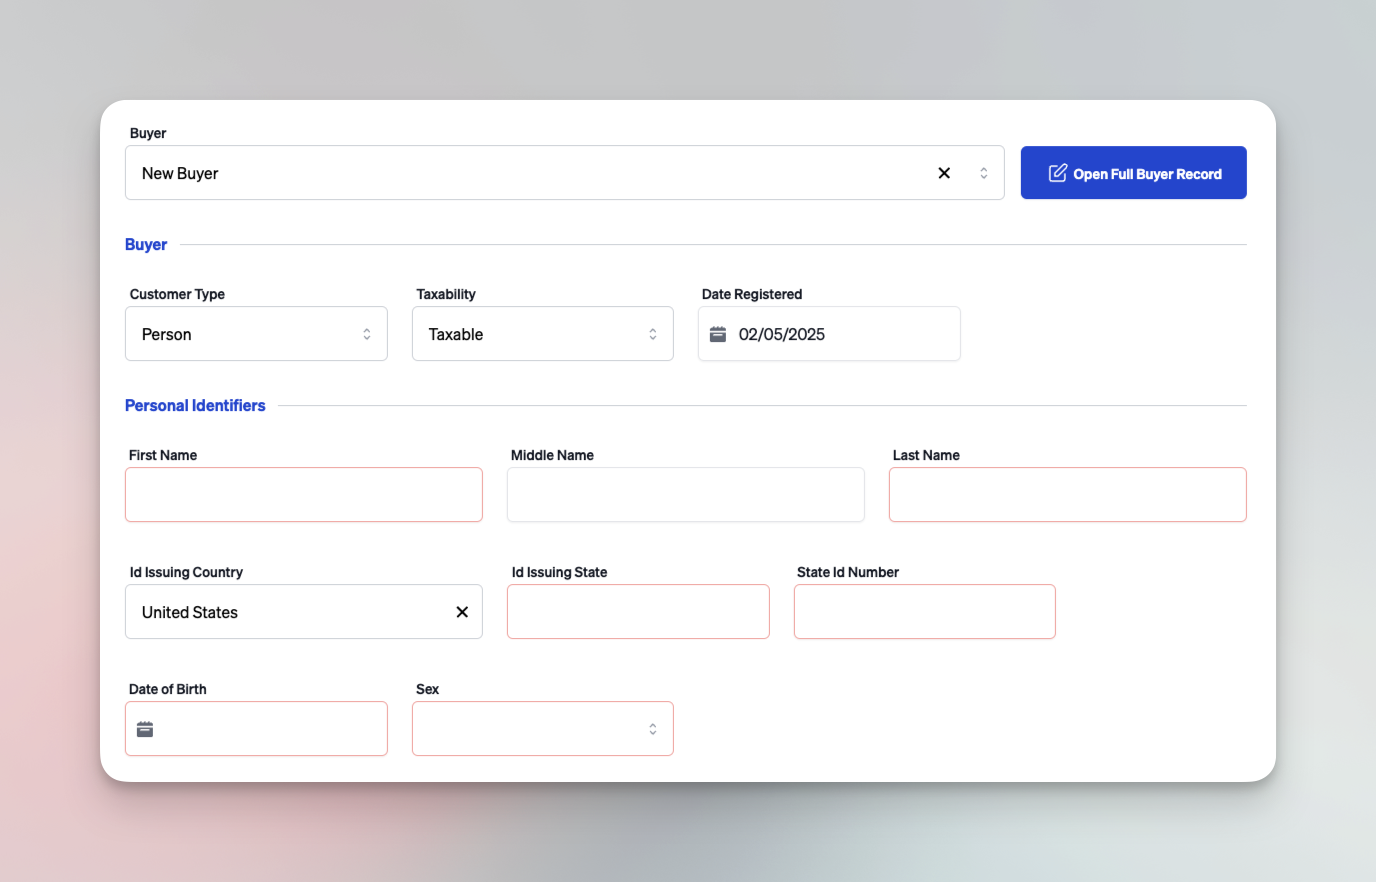
Determine Buyer Type and Enter Details
Buyers can be Individuals, Companies, or Dealers. Depending on the selected type, the required fields vary. A Company is a non-dealer business entity, while a Dealer is a licensed car dealer.
Co-Buyer and Lienholder
If your deal involves a co-buyer or a lienholder:
- Co-Buyer: Similar steps as the main buyer. Select or create a new customer record.
- Lienholder: Select or create a new lienholder record with the required identification (business name, FEIN, address).
Trade-in Tab
If your deal involves a trade-in vehicle:
- Search for an Existing Trade-In Vehicle or Add a New Vehicle
- Follow the same steps as in the Vehicle tab.
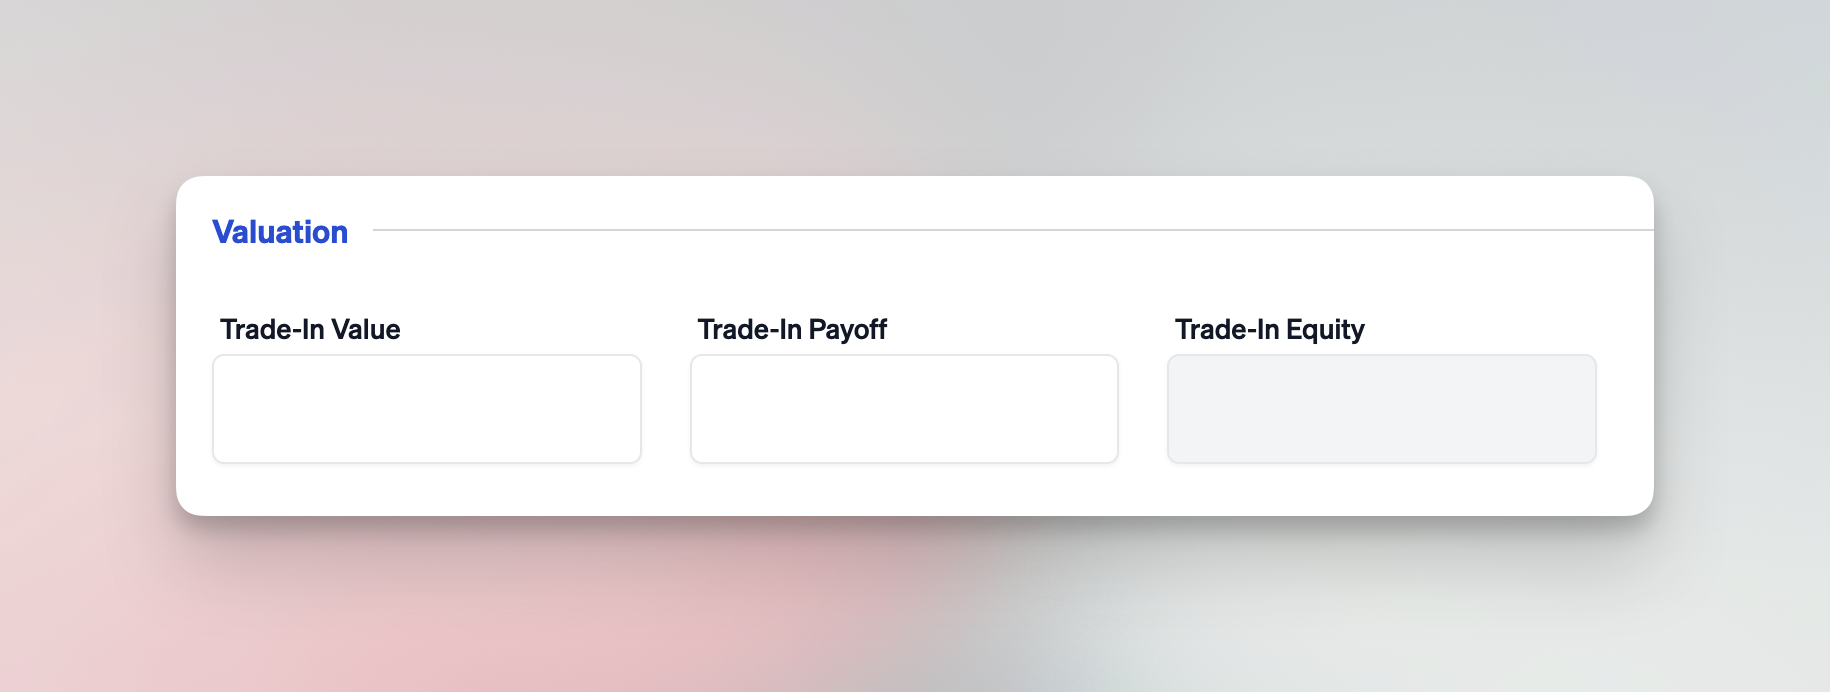
- Specify the Trade-In Value
- Enter the trade-in value in the designated field.
- If the vehicle has a balance owed to the current lienholder, enter it in the Trade-In Payoff.
- Trade-In Equity is how much the trade-in vehicle is worth after the payoff amount is deducted. This net value is what will be applied to the new vehicle purchase.
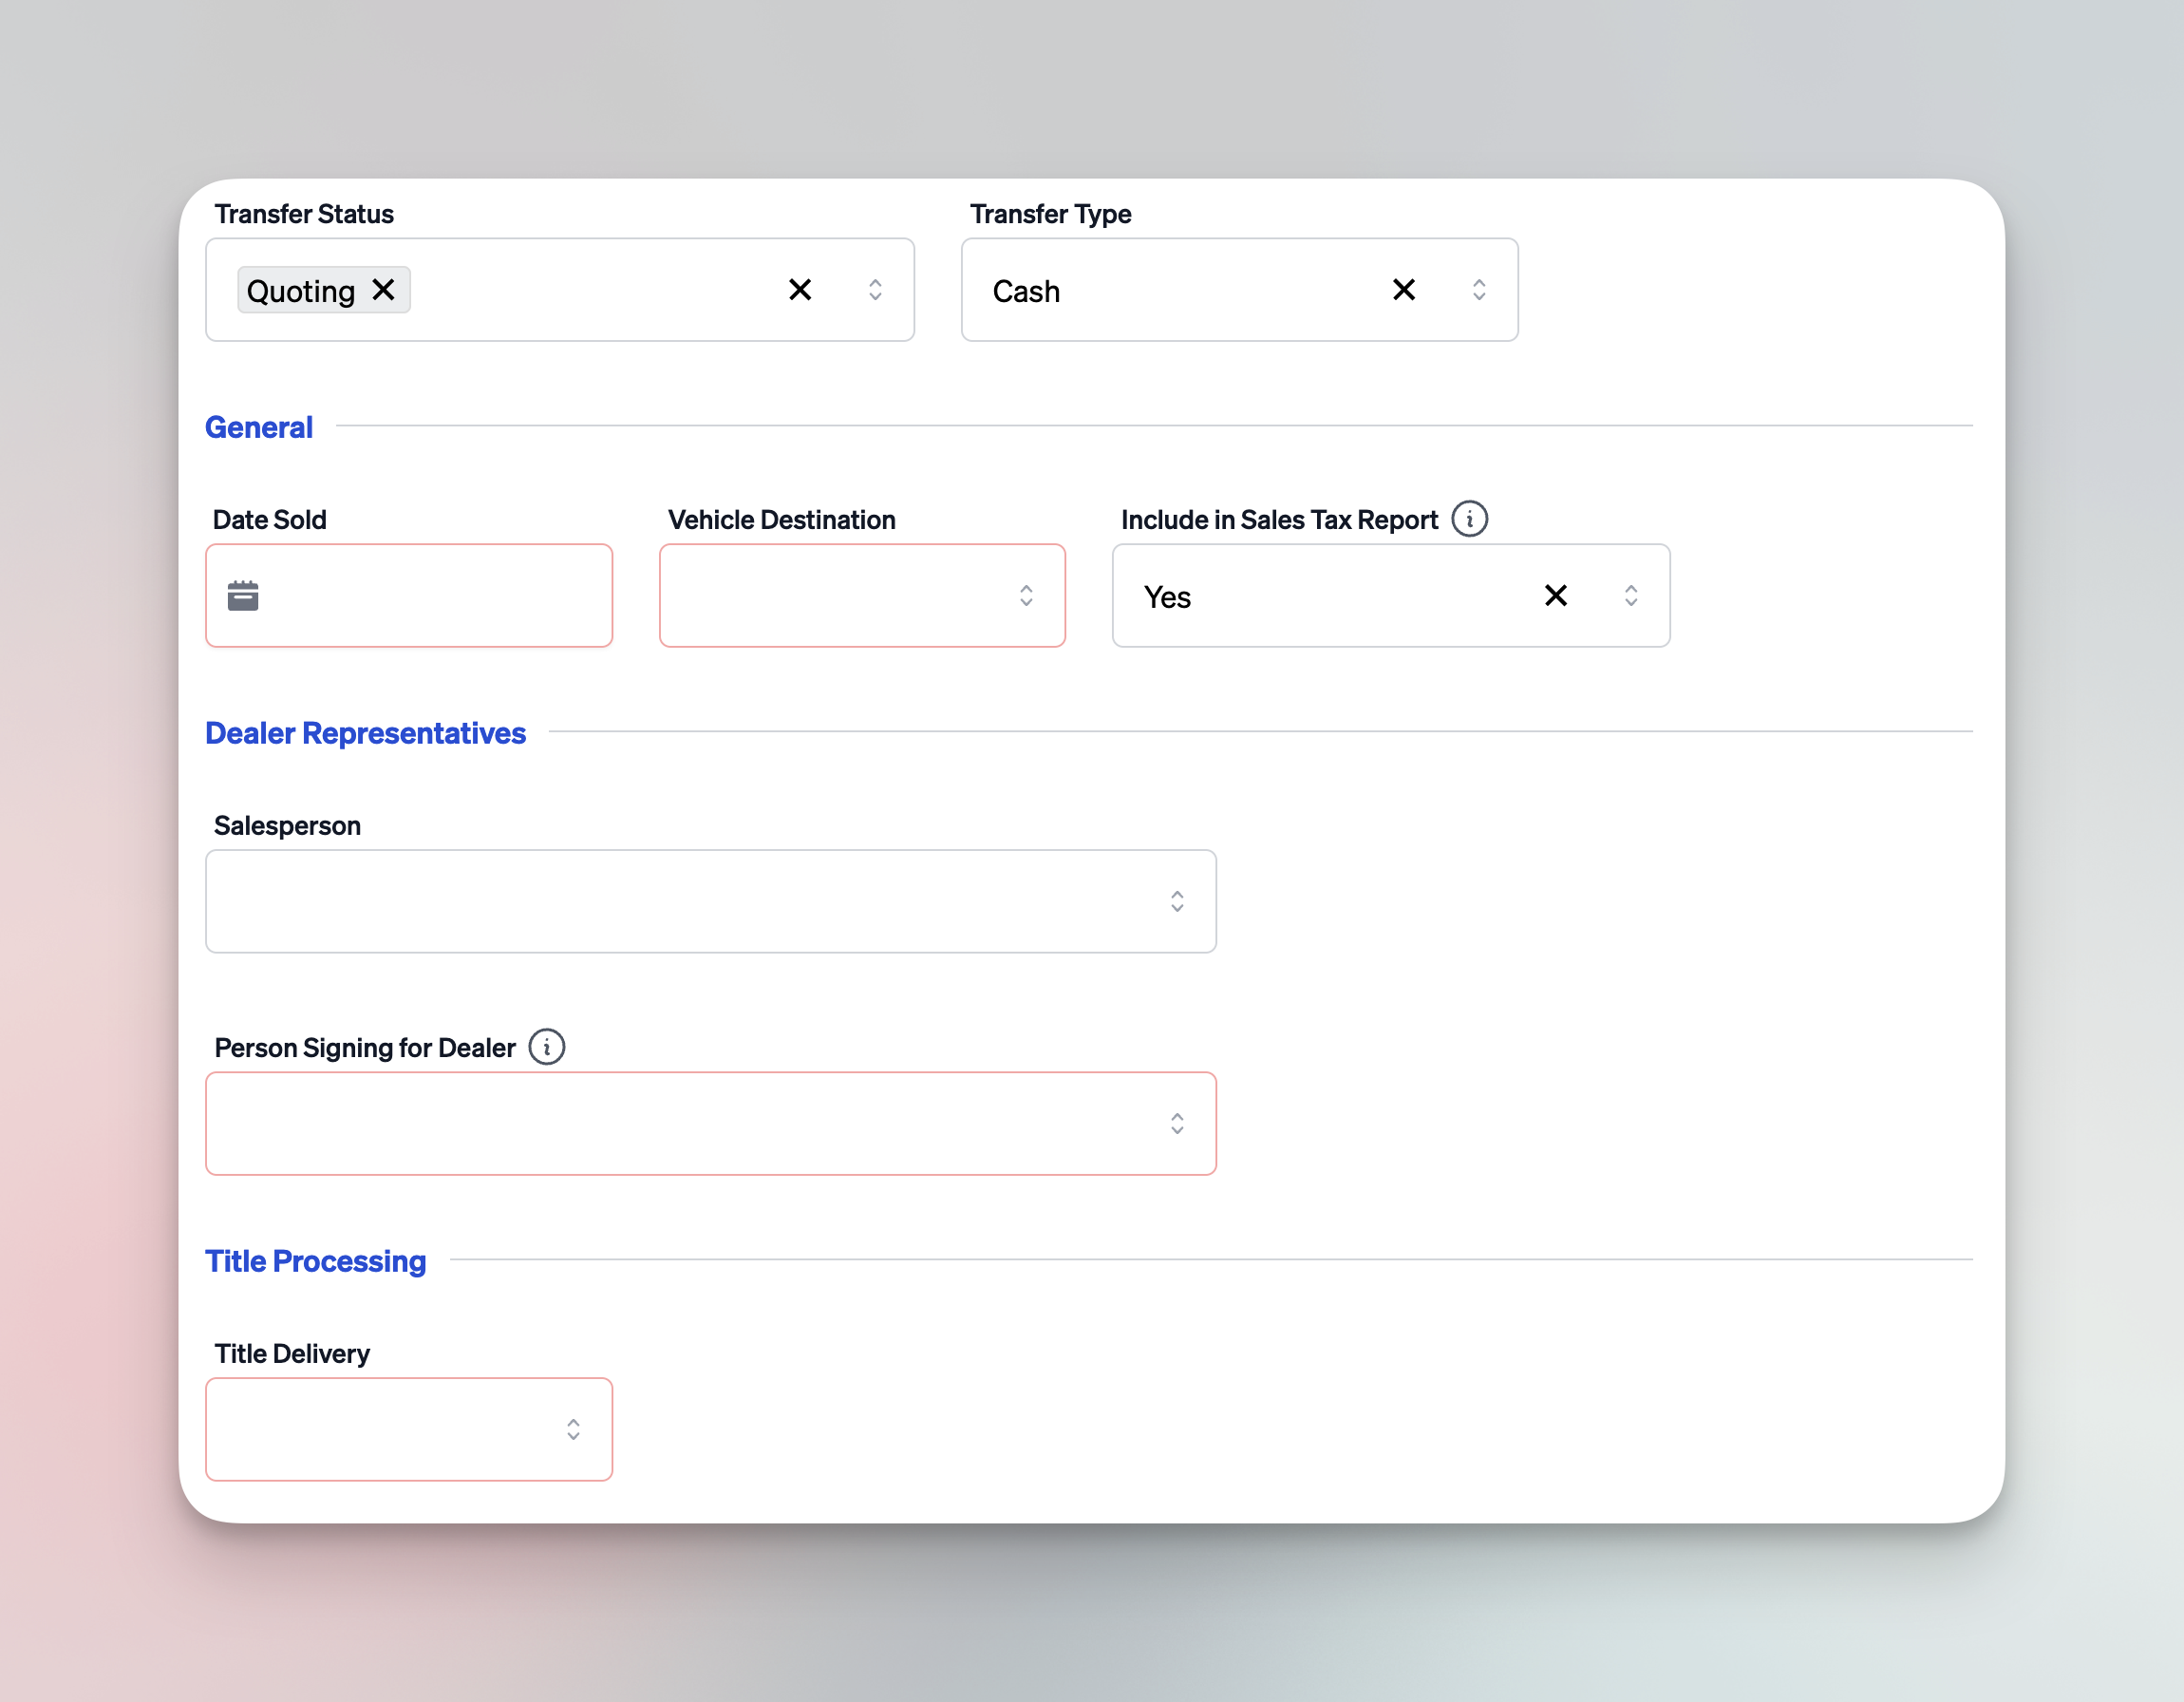
General Tab
The General tab captures broader deal information:
- Date Sold: By default, it populates with the date you created the deal jacket (you can adjust if needed).
- Vehicle Destination: In State, Out of State, or Export.
- Salesperson: Choose from the users in your dealership account.
- Person Signing for Dealer: Choose from the users in your dealership account who are authorized to sign on behalf of the dealer.
- Title Delivery: Select Mail, Electronic, or Fast Title (printed on the spot).
- License Plate Processing Type: Options include:
- New Tag: brand new tag and the person does not have credit available in the system to use toward the initial tag fee.
- New Tag with Available Credit: brand new tag and the person has credit available in the system to use toward the initial tag fee.
- Valid Tag: transfer an existing, unexpired tag from another vehicle.
- Renew Tag: renew an existing tag that is about to expire and transfer it to the new vehicle.
- Replace Tag: replace a lost, stolen, or damaged tag and transfer it to the new vehicle.
- No Tag: the person does not want a tag at this time.
- Insurance Policy Information: Enter policy details such as Company Name, Company Code, and Policy Number.
Pricing Tab
The Pricing tab is divided into two sections:
- Left Side: Vehicle and Transfer Prices, plus Taxes
- Right Side: Payments
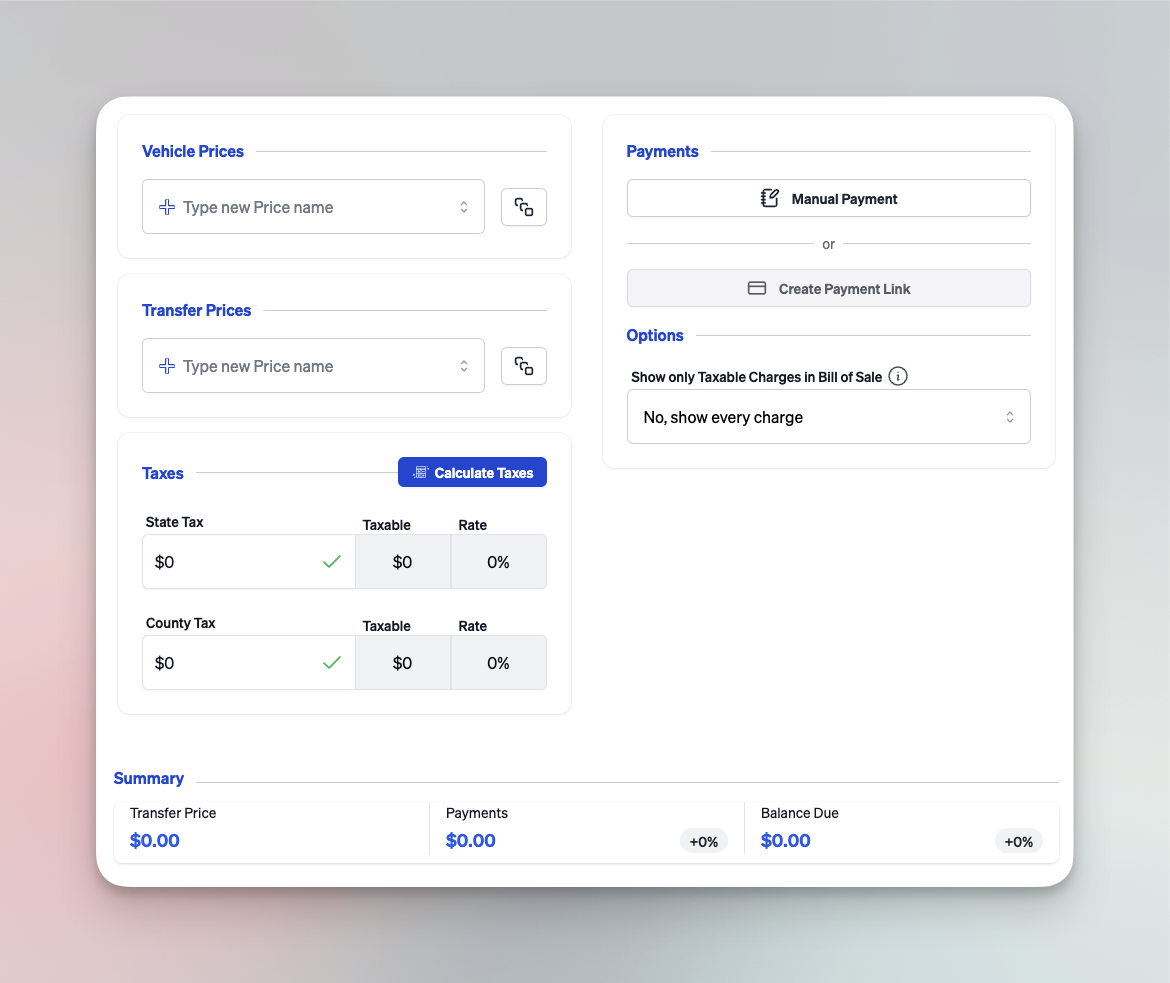
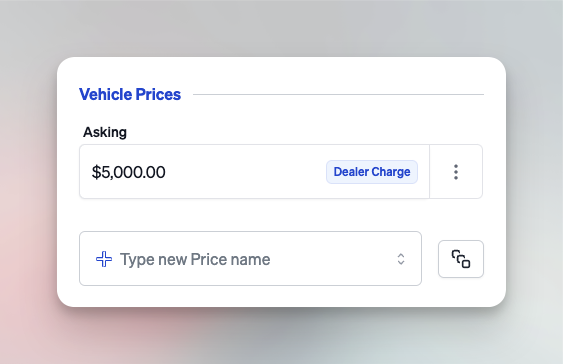
Vehicle and Transfer Prices
The Vehicle Prices section is usually for the vehicle sale price, while the Transfer Prices section is for additional fees and charges.
-
Vehicle Prices
- These values can be edited in the full vehicle record or here, directly in the deal jacket.
- Each price line starts with a label (e.g., “Asking Price”) and then an amount.
- Indicate whether each price line is a Dealer Charge.
-
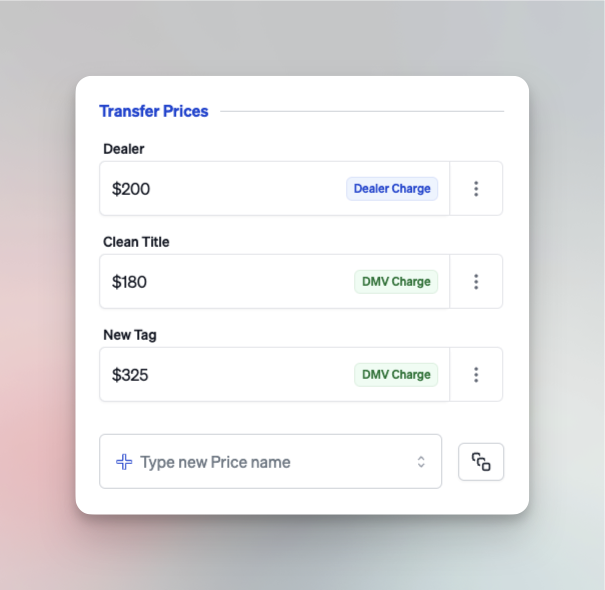
Transfer Prices
Below Vehicle Prices, add any fees (e.g., Dealer Fee, New Title, Tag Transfer, Storage).infoAll fees you charge the customer (vehicle sale, dealer fee, etc) are considered Dealer Charges. All government fees (e.g., new title fees, tag transfer fees) are considered DMV Charges.
-
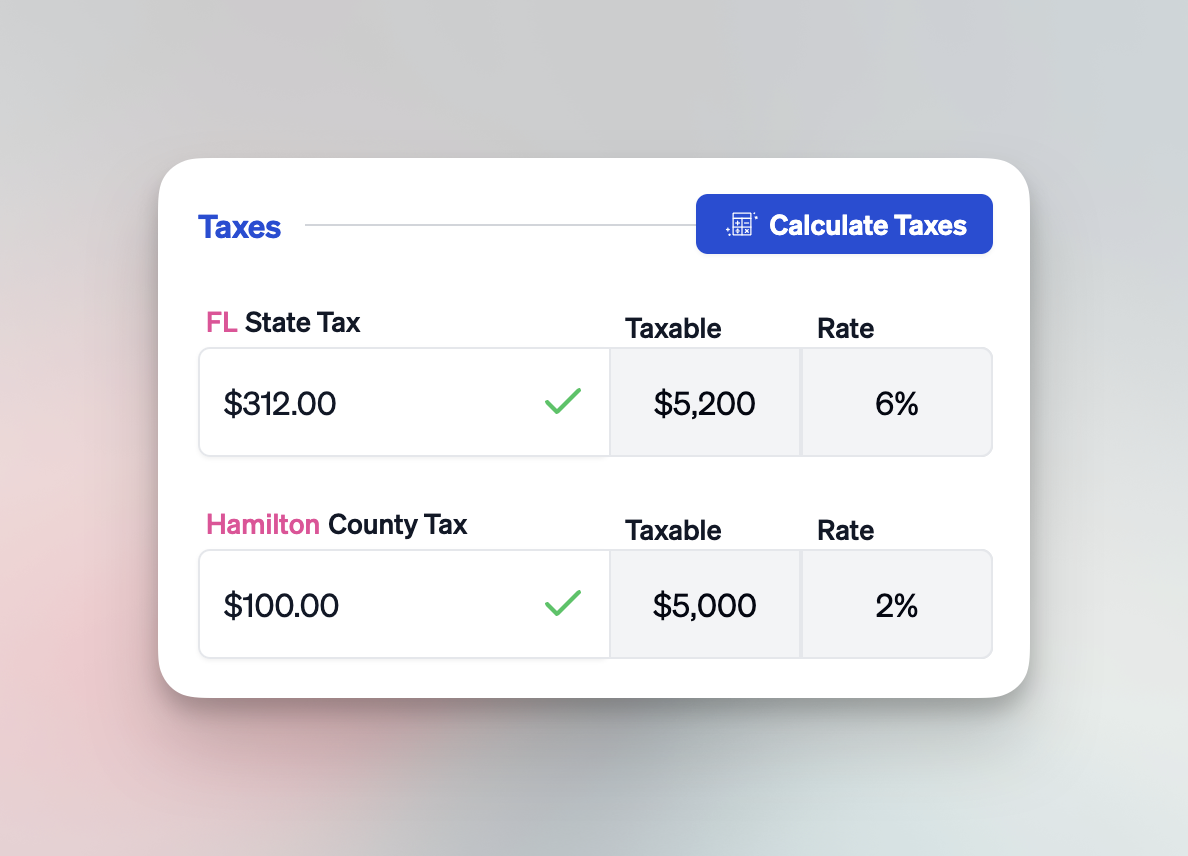
Taxes
- After entering all taxable lines, click Calculate Taxes to auto-calculate state and county tax.
- The system sums all taxable items to determine the total tax due.
Payments
On the right side of the Pricing tab, add your customer's payments or create a payment link for online payment:
-
Manual Payment
Click Manual Payment and input a custom label (e.g., “Deposit,” “Cash Down,” “Check Payment”) and amount. -
Create Payment Link
Select Create Payment Link to open a modal where you can specify the payment amount and details to receive a credit card payment from your customer. For more details, see Creating a Payment Link.
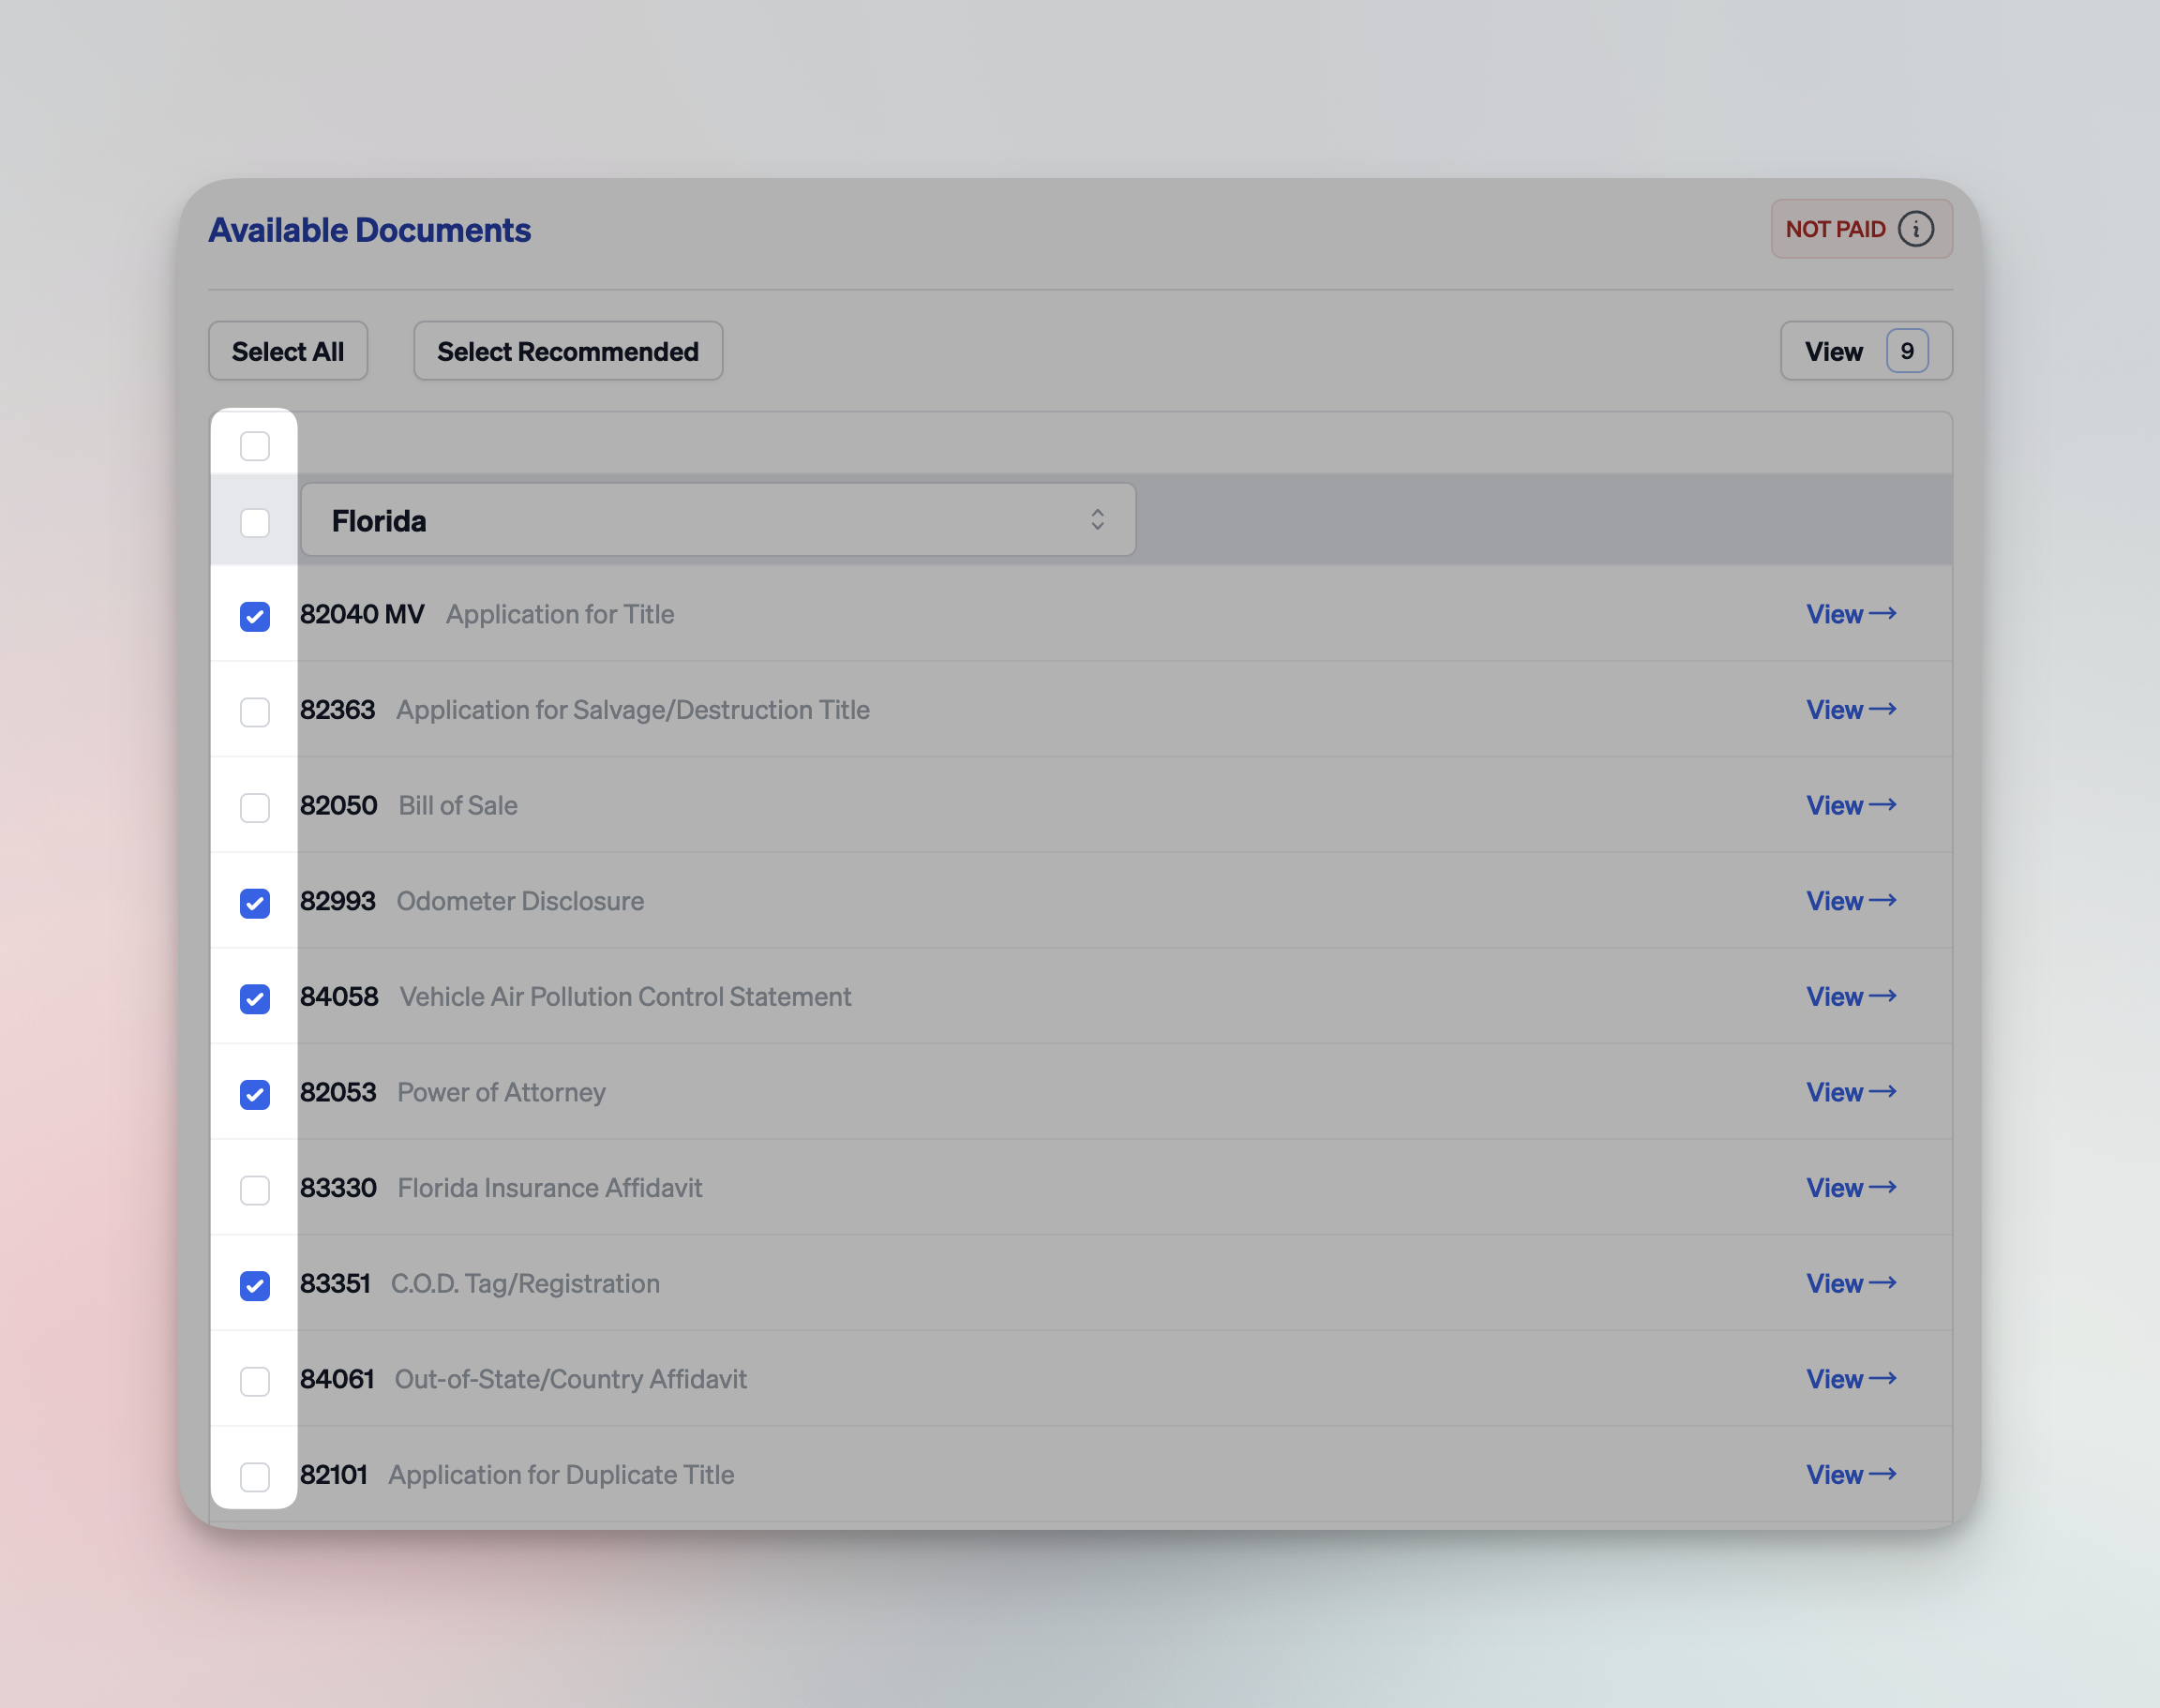
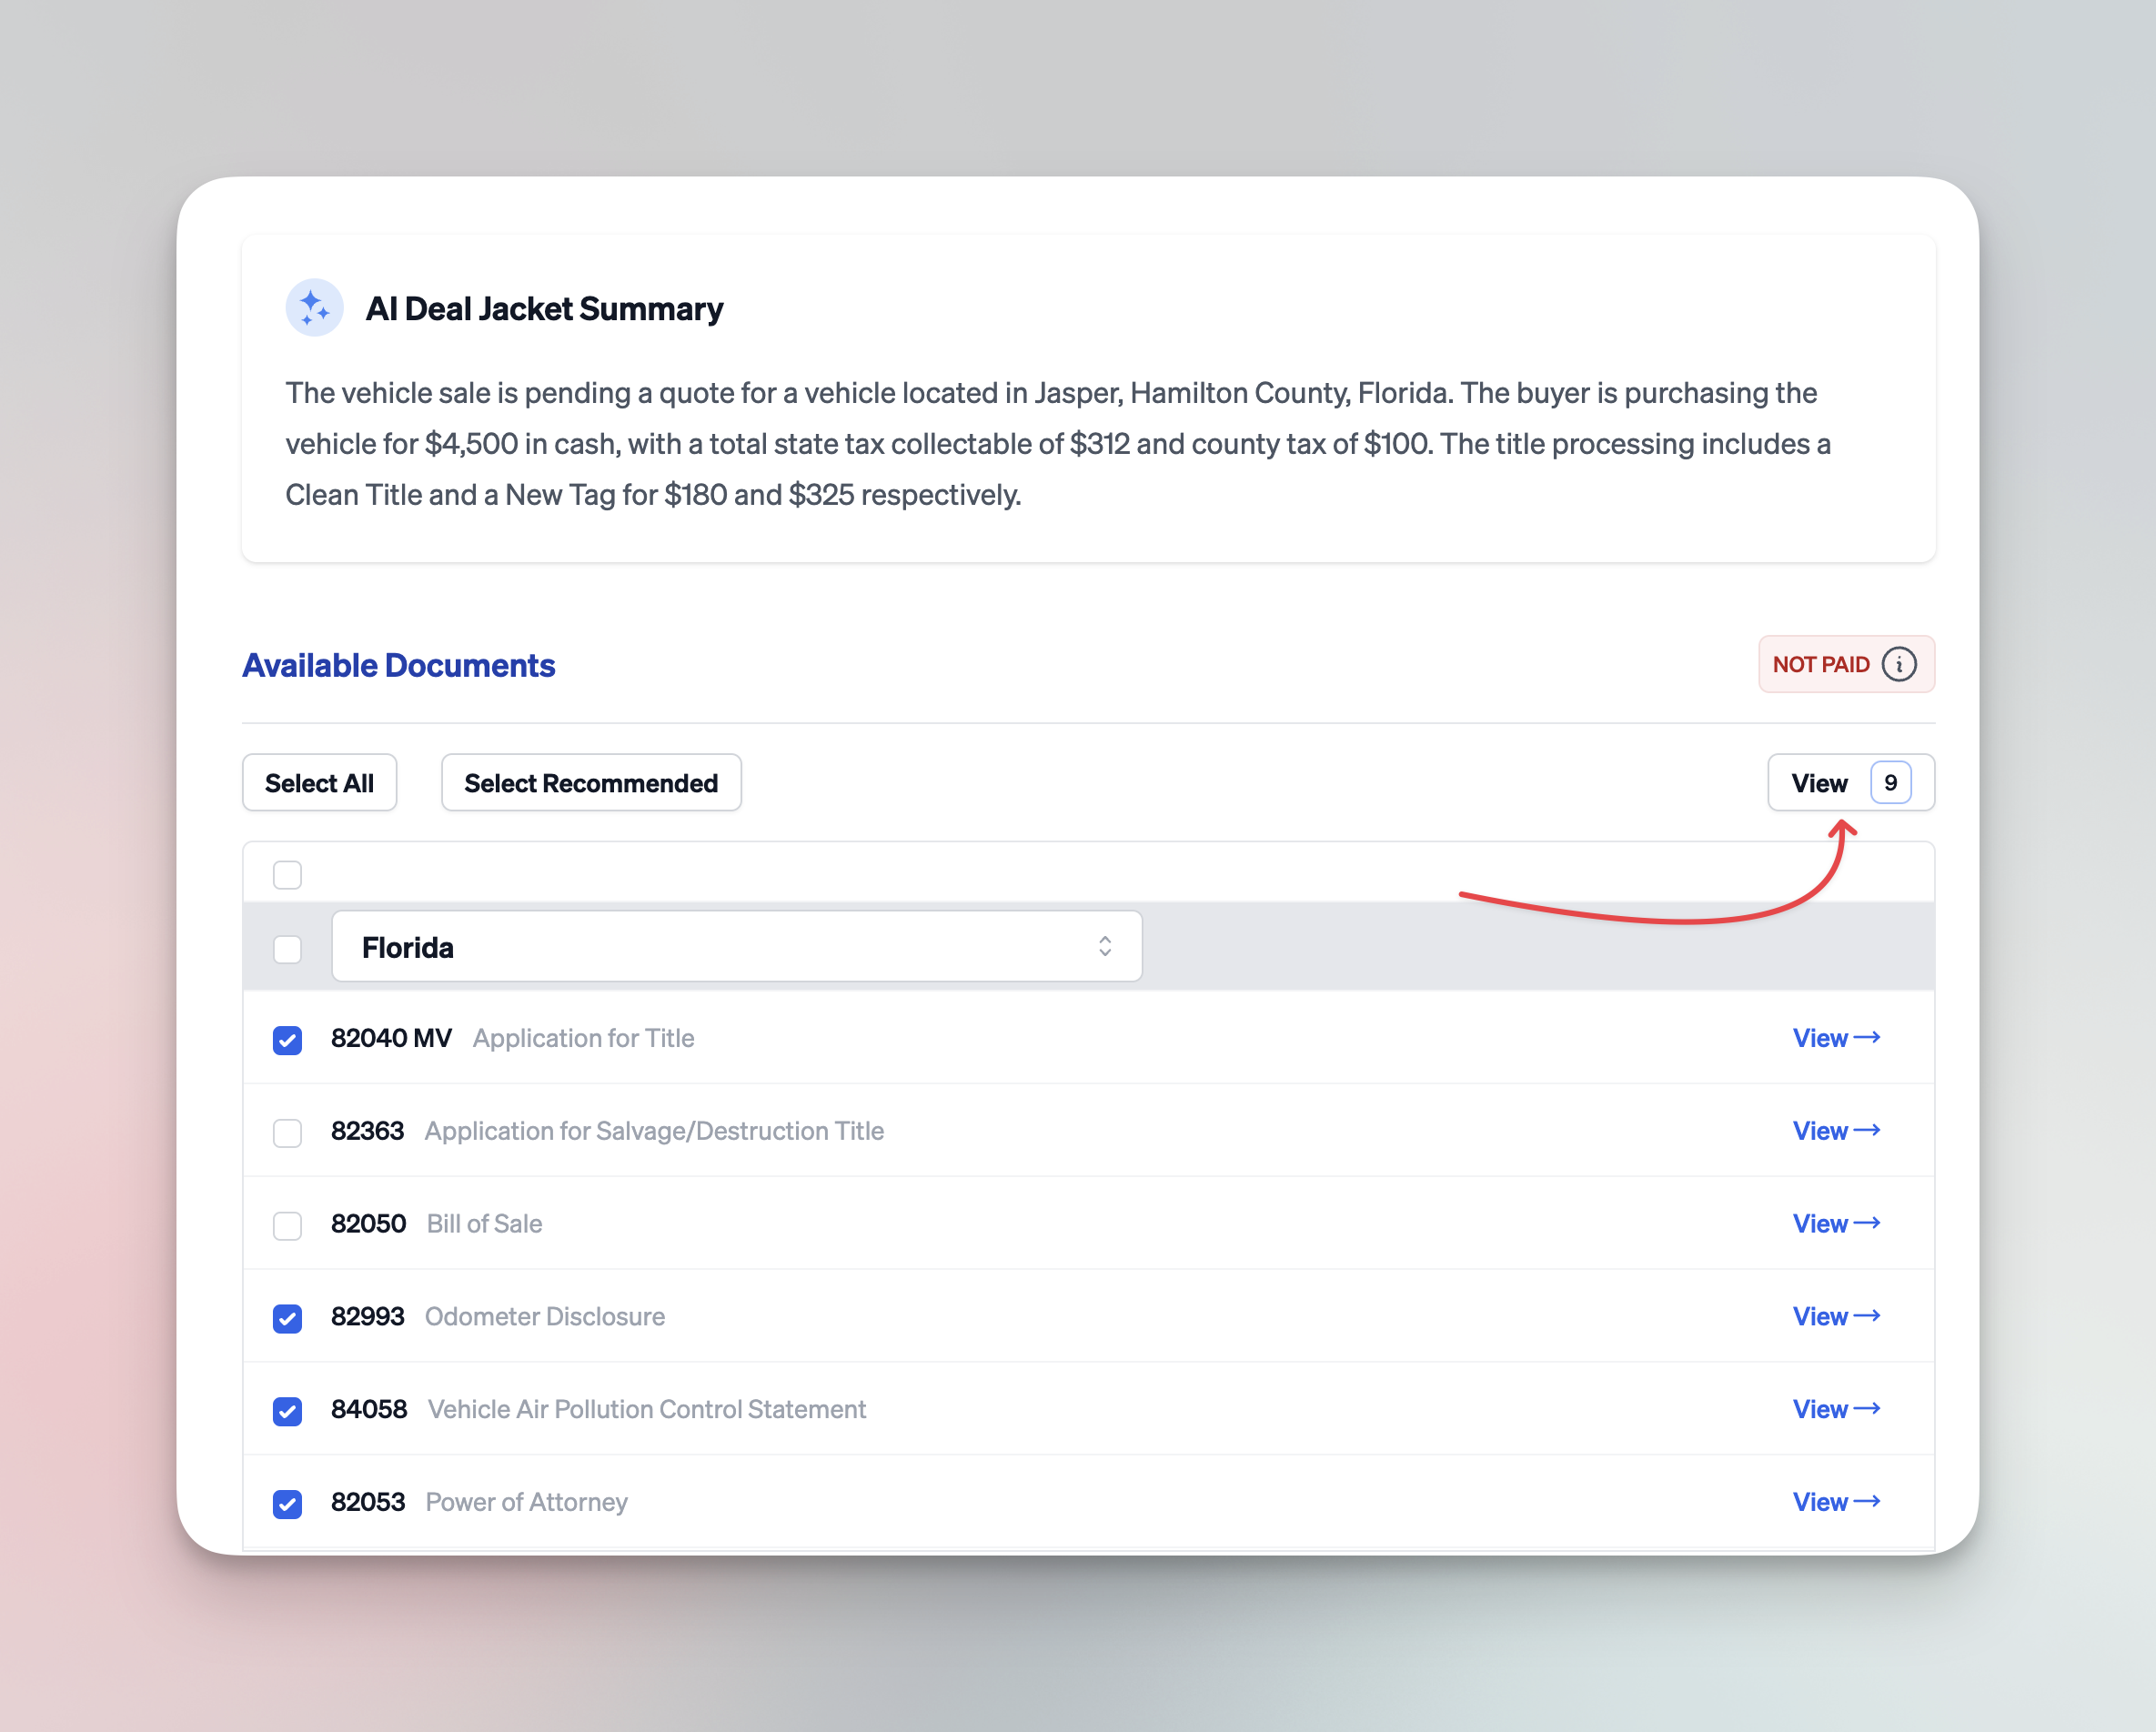
Documents Tab
In the Documents tab, you’ll see a list of forms that can be automatically filled with the information provided in the previous tabs:
- The Recommended forms for your deal type are pre-checked.
- You can select or unselect any form to customize which documents to generate.
Be sure to review and save the deal jacket before generating documents.
Viewing and Printing Documents
- View Individual Document: Click View next to a single form to open a PDF of that document pre-filled with your deal data.
- View All Documents: Click the View button at the top to open all selected documents in a single PDF.
You will be charged $1.20 in account credits once per deal jacket—the first time you generate any document(s). Subsequent views or prints within the same deal jacket are free.
Final Steps and Next Actions
After completing all tabs, your deal jacket is fully configured. You can:
- Edit any tab at any time to update details.
- Revisit the Pricing tab to add, remove, or adjust fees and payments.
- Open or print documents in the Documents tab as needed.